The use of microphones for sound reinforcement purposes for a brass band or big band depends on the intention: does the sound engineer want to amplify the entire ensemble to ensure that it can be heard from a distance? Will the microphones only be used to create a monitor mix that allows the musicians to hear themselves while playing? Or are the microphones needed to record the performance?
1. Intensity Stereophony
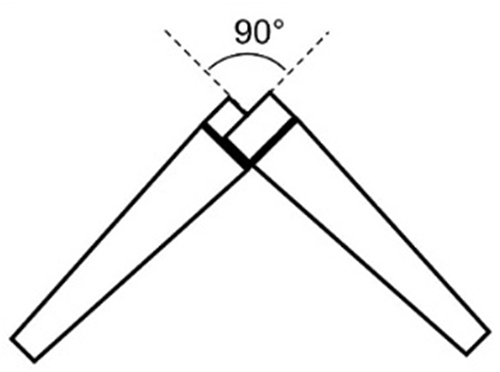
XY microphone setup
The XY technique is probably the easiest approach for a stereo setup: both microphone capsules are located on the same plane and at equal distances from the sound source. The microphones need to be installed on top of each other at a 90° angle. A so-called “stereo bar” makes this a breeze. It has to be said, however, that the angle can be set anywhere between 45° and 180°, which may come in handy for a wide (i.e. large) ensemble. The preferred microphone type for this setup is based on small-diaphragm condenser microphones with a cardioid pickup pattern. The spatial resolution results from the differing intensity of the signal being picked up. Another kind of intensity stereophony is called the “mid-side approach” (MS), where one cardioid or omni-directional microphone is used for the “center” (mid) and directed at the sound source, while a second mic with a “figure of eight” pattern is installed at a 90° angle. It needs to be positioned at the same distance as the first mic. In addition to a special figure-of-eight microphone, you also need to mix the directivity (using a mixing console) to achieve a convincing result. The MS approach offers the advantage of better mono compatibility and subsequent editing of the stereo width. While intensity stereophony—if performed with the correct angles—provides good sound localization, especially in the midrange, the low-frequency range tends to be slightly more subdued. The sonic result is therefore first and foremost “clean” and “bright”, with a boost in mid- and high-frequency ranges.
2. Delay Skew Stereophony
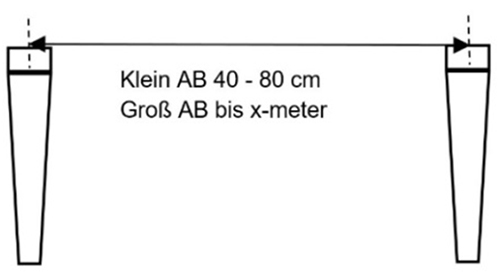
A/B microphone setup
An A/B microphone setup is as easy (or complex) as a XY setup. This setup is often complemented with a number of spot microphones. This technique is not mono compatible. Again, small-diaphragm condenser microphones are used for the A/B technique Omni-directional microphone patterns are usually preferred, although the use of cardioid mics is usually recommended to attenuate sound sources and noises behind the microphones.
The two microphones are set up in parallel, at a 40~80cm distance from each other, and pointed at the sound source (“narrow A/B”). For larger ensembles, the distance between the microphones may need to be increased quite substantially (“wide A/B”). The microphones should be positioned in such a way that there are no noticeable level differences. The spatial distribution is the result of the time the sound source’s signals take to reach each microphone. While this setup provides ample depth in the sonic image, the localization of individual signals is more hazy than with an XY setup—the left and right sides of the stereo image tend to be more dominant. On the upside, the resulting sonic image has more “body” than with an XY setup.
3. ORTF
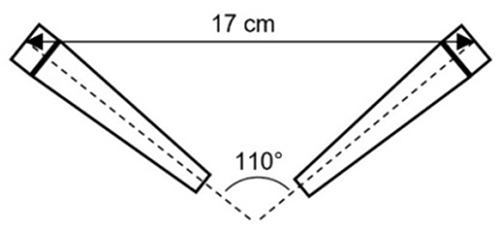
ORTF Microphone Setup
A blend of the two microphone pickup techniques discussed above is called “ORTF” (Office de Radiodiffusion Télévision Française).
Its time alignment and delay skew are more subdued. By default, two small-diaphragm cardioid condenser microphones are mounted onto a rail and placed at 17cm from each other. The capsules are turned outward, at a 110° angle (which is the opposite of the XY setup). This angle, however, may be changed depending on the distance between the microphones (5cm~30cm) and be anything between 0° and 180°. This setup offers two advantages: a balanced spatial distribution and excellent sound localization.
Stereo microphone pickup strategies offer the following advantages:
There are also a few drawbacks:
The major drawback of stereo miking is no doubt that it is impossible to change the levels of solo parts, voices or sections to achieve a more convincing balance. That is indeed only possible if each relevant part is picked up with a separate microphone: each individual instrument, the various voices or entire sections. Only then will it be possible to change the balance and sound of the various sections and/or parts. Plus, it will be easier to create personalized monitor mixes.
One important aspect to bear in mind are the laws of physics. First off, every microphone (no matter how expensive) picks up a lot more than just the signal you are after. Depending on its polar pattern, a microphone picks up a variable amount of neighboring sounds—an effect called “bleeding”.
The microphone in front of the 1st tenor sax, say, will also pick up the sound of the 1st alto sax two chairs to the right as well as the 2nd tenor sax to its left. Such bleeds are obviously softer than the required main signal source.
We already touched on the comb filter effect while discussing mono and stereo microphone setups. This effect often surfaces when several microphones are used and when a given signal source bleeds into other microphones. Depending on the distance among the microphones, some frequency ranges may have different phases. Whenever the phase difference amounts to half a signal’s wavelength (which is admittedly an extreme case), the signal in question is canceled, i.e. inaudible. If two microphone signals are in phase, the resulting amplitude is boosted.
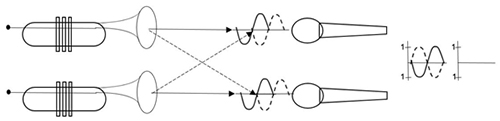
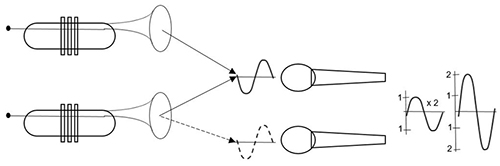
Example 2: Subtraction (cancellation)
Subtraction
Two trumpets are picked up using separate microphones. Due to bleeding, the signal of the “second” trumpet is picked up by the “other” microphone, but with a slight delay. This delay causes some frequencies to shift their phases. If the shift amounts to half a wavelength, those frequencies are canceled.
Comb Filter Effect—Linear Subdivision Of The Frequency Axis.
The same occurs when the phase is shifted by 1.5, 2.5, 3.5, etc., times the wavelength. And this is repeated for shifts amounting to 3, 5, 7, etc., times the wavelength. This effect can be visualized: it looks like periodic repetitions of frequency boosts when the phases are aligned—and troughs in frequency bands being canceled. It looks a bit like a comb—hence the name of this dreaded effect.
The best cure is to use the most appropriate microphone in the right places. Cardioid or hyper cardioid microphones that are less likely to pick up bleeding could be positioned close to the signal sources in question. The greater the distance among microphones and the smaller the distance between a microphone and the sound source it is supposed to pick up, the less bleeding (and hence comb filter artifacts) you get.
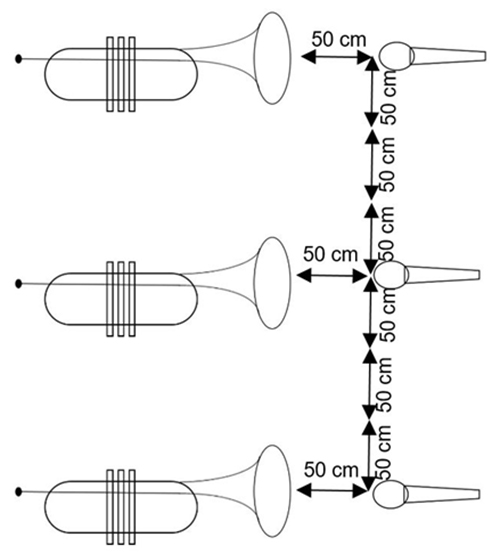
One rule of thumb is that the distance between two or more microphones needs to amount to three times their distance to the relevant signal source: In the next installment of this workshop, I shall discuss which microphones you could select for separate miking of each signal source and where and how they should be positioned. |
Cheers, Yours Big Jay.